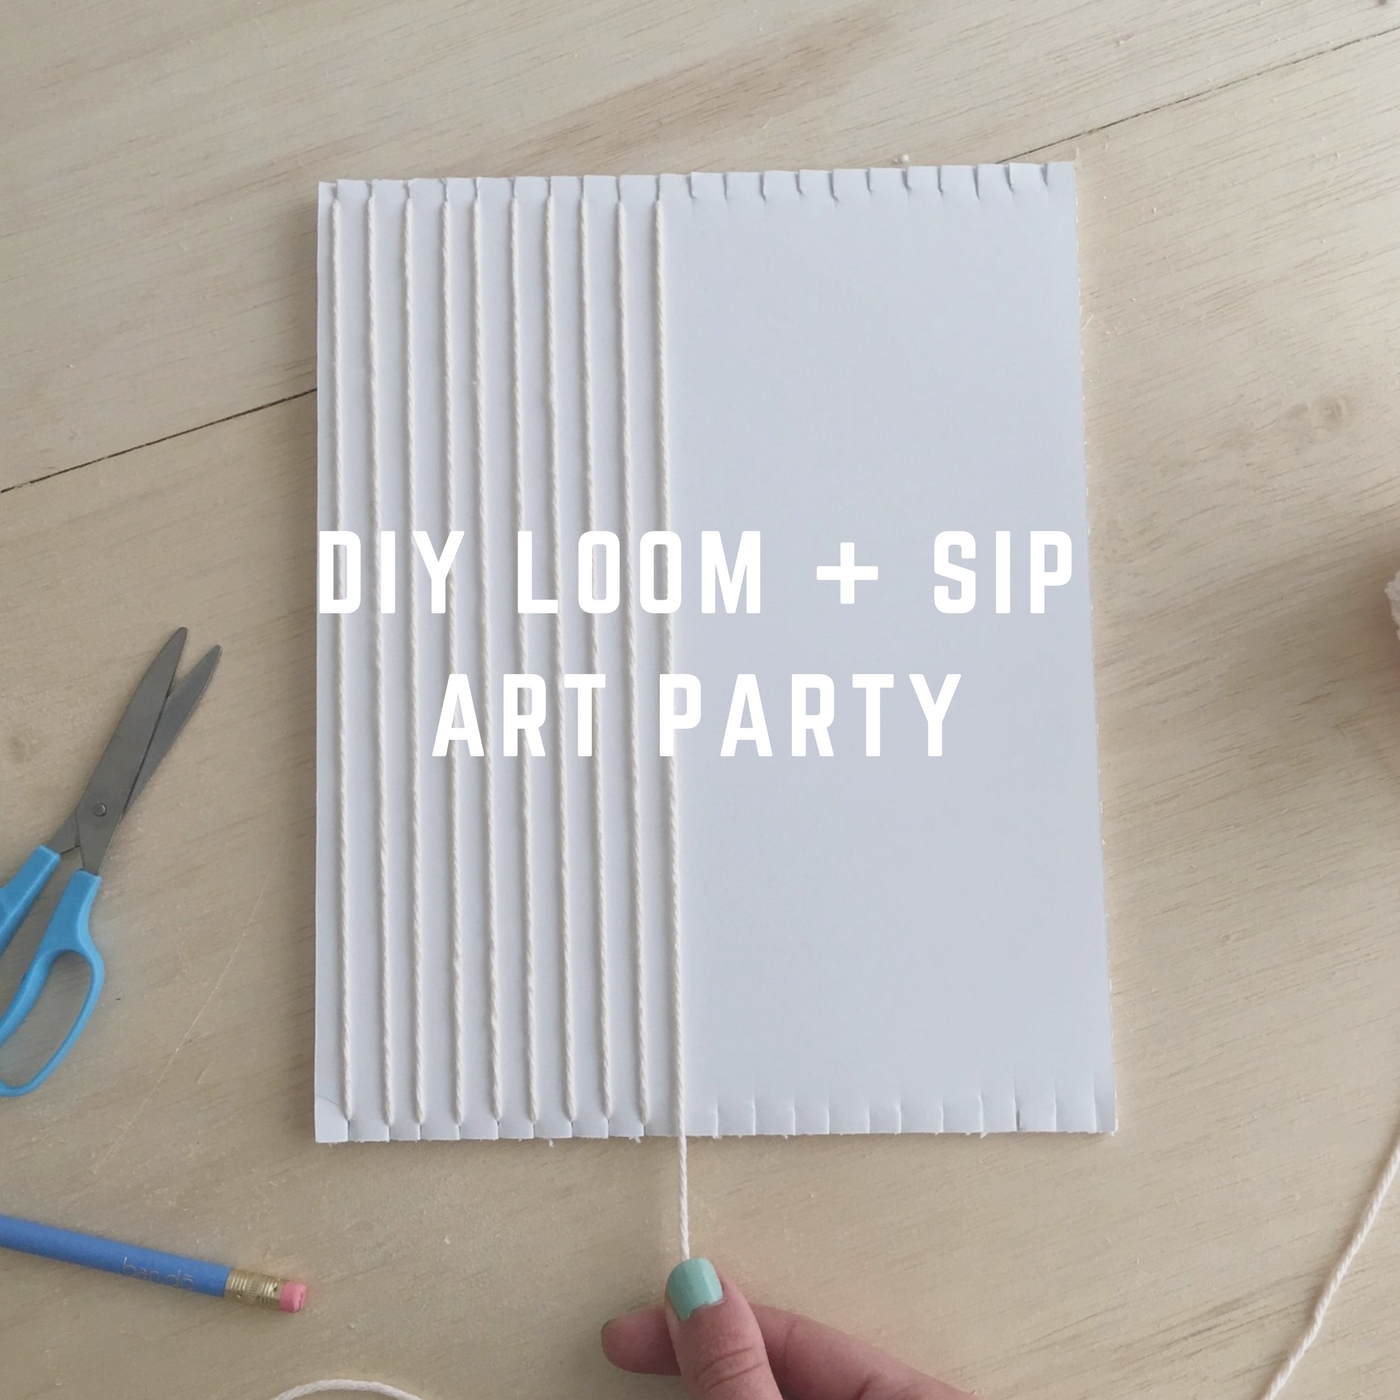
DIY Loom + Sip Art Party
Being new-ish to Los Angeles has turned out to be the best opportunity to expand my creativity. Since setting an intention to meet new people and basically becoming a platonic speed dater, I’ve stumbled down into an amazing rabbit hole of creative social gatherings.
Along the way I've been to book clubs, workshops, figure drawing meetups, artist salons, and even a Surrealist game night. Out of a lucky encounter with another creative at my own watercolor paint + sip with Six Degrees Society, I magically became one of the first members of an embroidery club that meets in beautiful, eclectic homes around LA and often (always) involves red wine and too much cheese.
I’ve gotten so into this alcohol + art combo that I'll think up any excuse to bring them together. So I recently hosted a Loom + Sip at Pono Burger in Santa Monica as a crafty kickoff to summer. My guests and I had the best time crafting and sipping and eating fries, so I'm spreading the word and encouraging you to try it at home!
Here’s what you’ll need to host your Loom + Sip:
Cardboard or foamcore looms (DIY instructions below!)
Yarn
Tape
Needles (large plastic or metal tapestry needles)
Scissors
Wooden dowels (a couple inches longer than the width of the loom)
Drinks! (weaving feels like a summer craft, so rosé or a sunny Hefeweizen would pair well)

How to make the looms:
You could help your guests make their own looms, but I've found that people really want to get into the weaving quickly and having to make their own loom just delays the fun. I suggest making the them ahead of time so when everyone arrives you can get to the good stuff right away!
First choose your material: cardboard or foamcore, whatever you have around the house is perfect. Both are totally reusable and your wall hangings will be just as beautiful either way. However, I do find that foamcore seems more sturdy and there’s less chance of it bending as you weave. Foamcore also looks good because it’s all white and you can even get it in pretty colors just for giggles. If you want pretty cardboard, you can buy a big science fair project type display board that has a solid white side.
Choose the size you’d like for everyone to work with then use a craft knife to cut your cardboard or foamcore down to size. I made my looms 8 x 10 in, but you can do smaller ones for a quicker project or bigger ones if you’re psyched for a long night of weaving! For reference, it took me and my guests about an hour and a half to two hours to complete our 8 x 10 weavings, though that also included a lot of breaks for chatting and French fry bites.
Now to turn that little board into a loom. Place your ruler along one of the shorter sides and use a pencil to mark where each slit will be cut. Math, fractions, measuring - these things aren’t my thing so I just start in the middle and then make a dash mark at every three lines on either side. If you want to be fancy, that’s 3/10 in. You can also make the slits farther apart to create more of a loose weaving. Just make sure they’re all the same distance apart!
When you’ve marked all the dashes along one side, turn the board around and do the same on the opposite short side. This will give you dashes along the top and bottom of your board.


For the next step, just cut a slit at every dash mark along both sides. I used scissors, even with the foamcore, which was surprisingly easy to cut. If you’re more comfortable with a craft knife that works too. Now you’ve made a loom! Repeat these steps to make enough looms for each guest.
Next, get weaving with your guests!
When it’s time to weave, have your friends choose a yarn color for their vertical threads (warp threads) and cut a length of yarn a few feet long. Then guide them to tuck one end of the yarn into the top left slit on their boards and tape the tail end to the back. Next you’ll each wrap your yarn all the way around the board tucking it into each slit snuggly as you go. When you get to the last slit tuck your yarn and tape the tail end to the back.


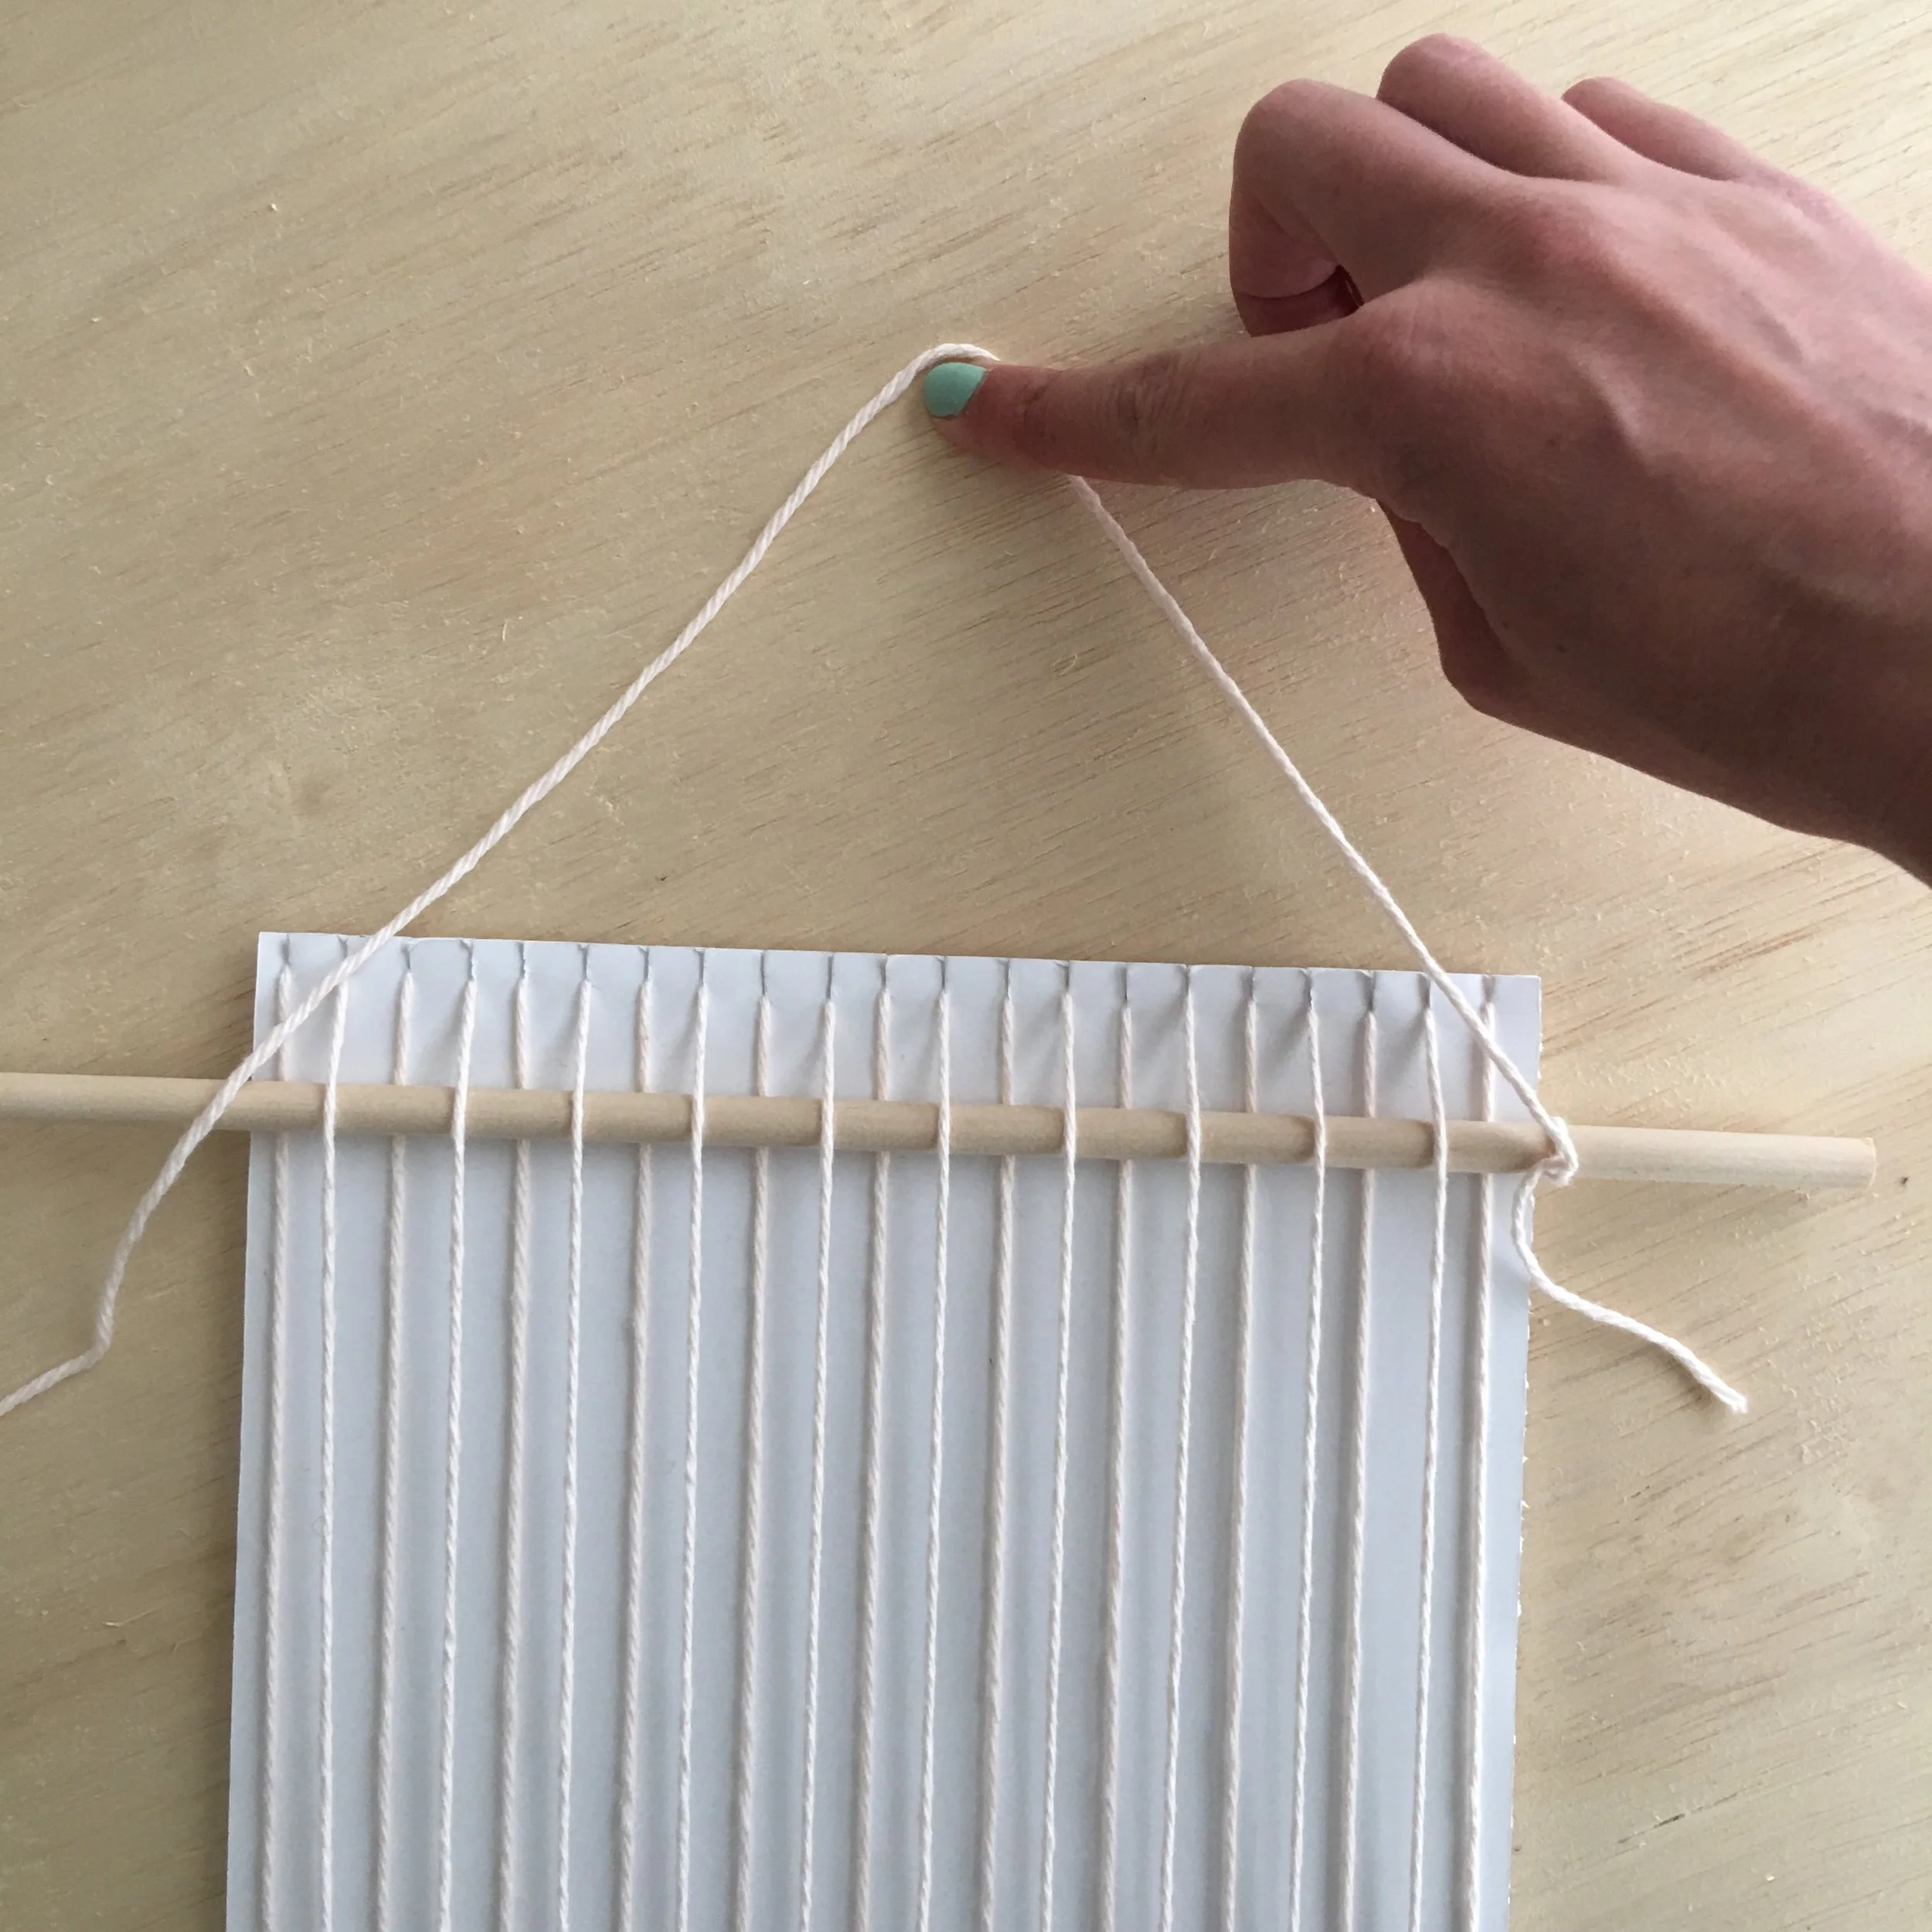
Now everyone add your dowels! Weave your dowel over and under the warp threads and push it to the top of the loom. Tie a piece of yarn to either side of the dowel so you'll be able to hang up your masterpiece later.


Then you’re all set for the best part! Thread your needles with some more yarn, leaving a short tail. Starting at the bottom left, weave over and under each warp thread and keep on going to the right side of the loom and back around. When you want to change colors, keep weaving long enough to get to one of the edges. Then drop your first color, letting a short tail hang to the side, and start your new color on the next row. Weave just as you did with the first color and continue to fill in the weaving.
Once you’ve each woven all the way up to the dowel you can finish off your weavings together or send your guests home with this printable instruction sheet. Have fun looming + sipping!
Explore EKS Art